How to translate the website
In a nutshell, you can translate the website using two methods:
- Weblate: A user friendly way to translate, you just connect to Framasoft's Weblate and directly translate with their all featured tool in your webbrowser.
- Po files on Git: Gettext and PO files. The files are located in the
po/directory of the website repository on Framagit. Merge requests about translation, correction, and proofreading are all very welcome.
Here under, you'll find more documentation for each methods.
Note: Make sure your language has been added to langs.json. This file is the backbone of the language in Pepper&Carrot project for telling what language is allowed or not, and it is hosted at the root of the webcomic repository.
1. Weblate
a. Define your Languages
After registering an account with Framasoft's Weblate, you need to define which languages you translate. Click on your avatar, then choose Settings, which will put you in the "Languages" tab:
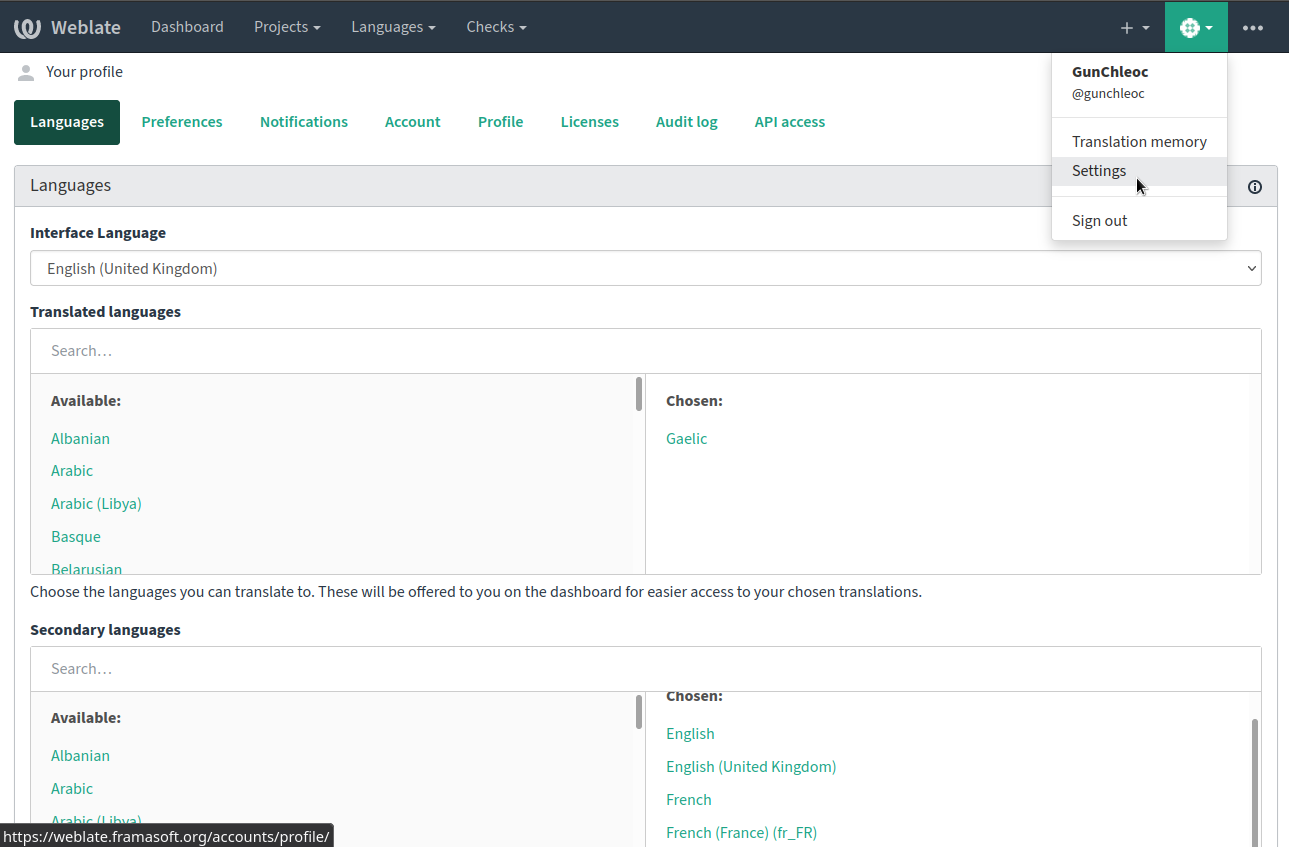
The "Secondary languages" are also useful if you want those languages' translations to appear next to the English source strings while translating.
b. Receive E-mail Notifications
Notification settings are important so that you will know when there are new strings to translate. This way, you won't have to come back and check manually.
Click on your avatar, then choose Settings → Notifications

You can also define special notification settings just for Pepper & Carrot if you want, from the project's main page (see screenshot below).
c. Translation Project Overview
The Pepper&Carrot Weblate project consists of 2 components:
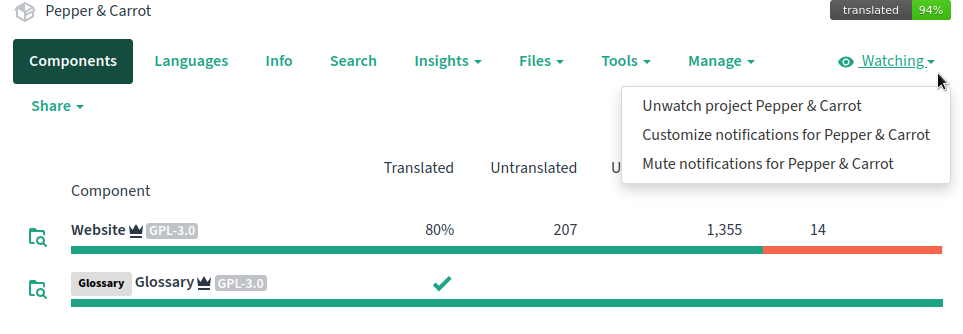
- Website: The file to translate... the website.
- Glossary: A less obvious one: the file containing glossary terms, to help you keep consistency in your translation. Glossary terms are shown while you translate the Website file, and you can also add and edit terms there.
c. File overview
This is what the main page of the Website file for your language will look like:
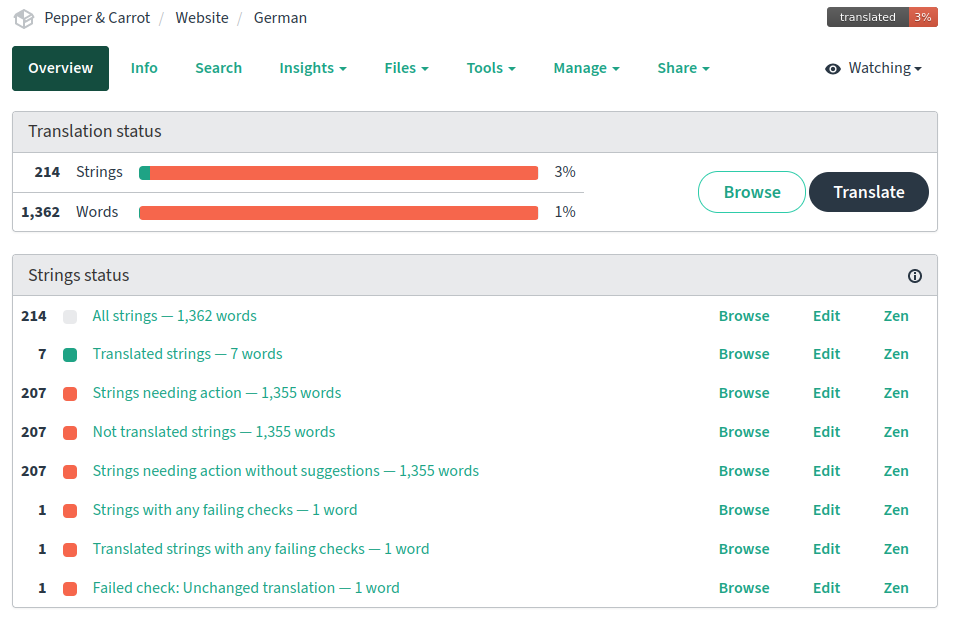
Note the translation checks in "Strings status" - you can click on a check description to start fixing. Once the checks are clear, use the "Translate" button to translate.
d. Translation View
While translating, there are different sections with information to help you get context.
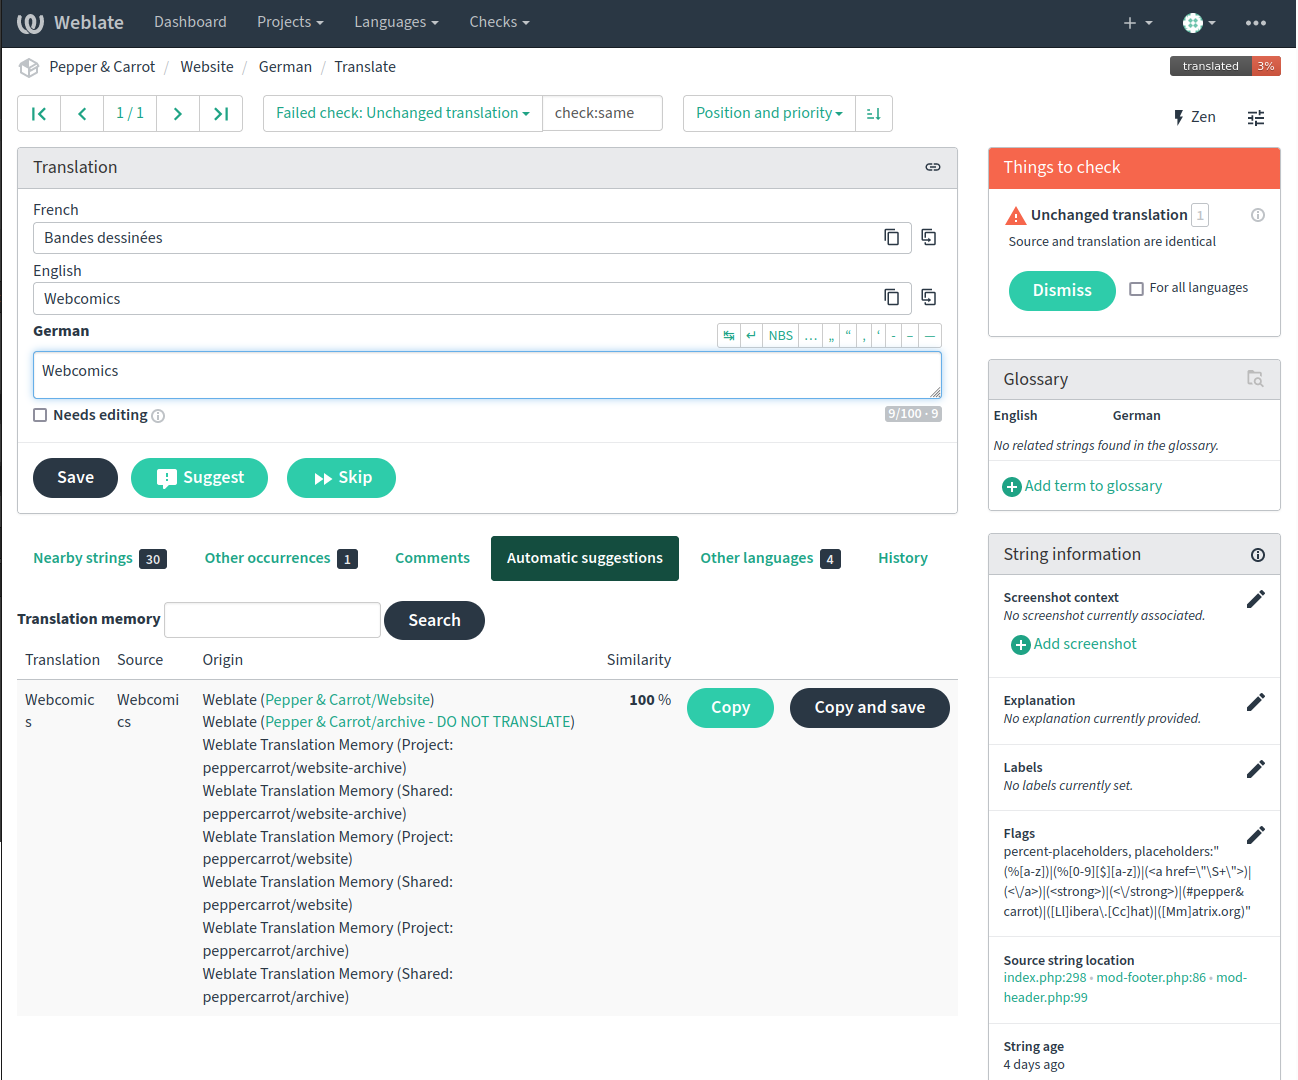
- The "Translation" section is where you do your work. Note that this screenshot shows the French translation along with the English source strings in this screenshot, because I chose it as one of my "Secondary languages" (see Define your Languages above). You can see additional languages' translations in the "Other languages" tab below the "Translation" section.
- The "Things to Check" section shows any failing automated checks. Make sure to either fix your translation, or dismiss the check if you disagree with it.
- The "Automatic Suggestions" tab below the "Translation" section shows similar strings that have already been translated. You can also search for keywords there. Do take some time to go through all these tabs find out what they can do for you.
- The "String Information" section will give you some additional information on the string. If reading a bit of PHP code doesn't scare you, you can use the "Source string location" links to give you more context on a string.
e. Connection between Weblate and Git
Framagit is the main source of the website, and once you start translating on Weblate, your changes are passed semi-automatically. e.g. Every few days or when someone downloads a .po file from Weblate, it automatically combines all the changes and sends a merge request to Git, or adds commits to the existing request.
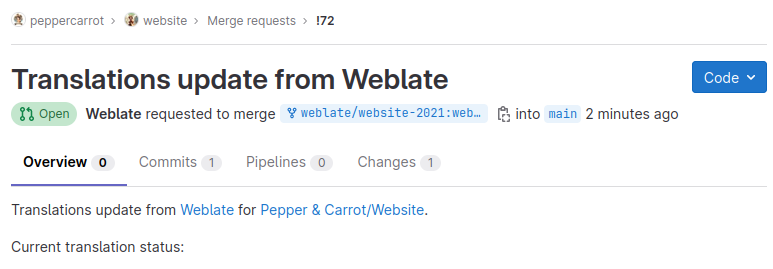
However, these merge requests still need to be approved by an authorized person.
f. Translating Offline
If you prefer to translate in your own tool (eg. because you prefer your own tool, or because your internet connection is limited), you can download and upload files in Weblate too.
- Visit the Website component
- Click on your language
- Choose "Customise download" from the "Files" menu
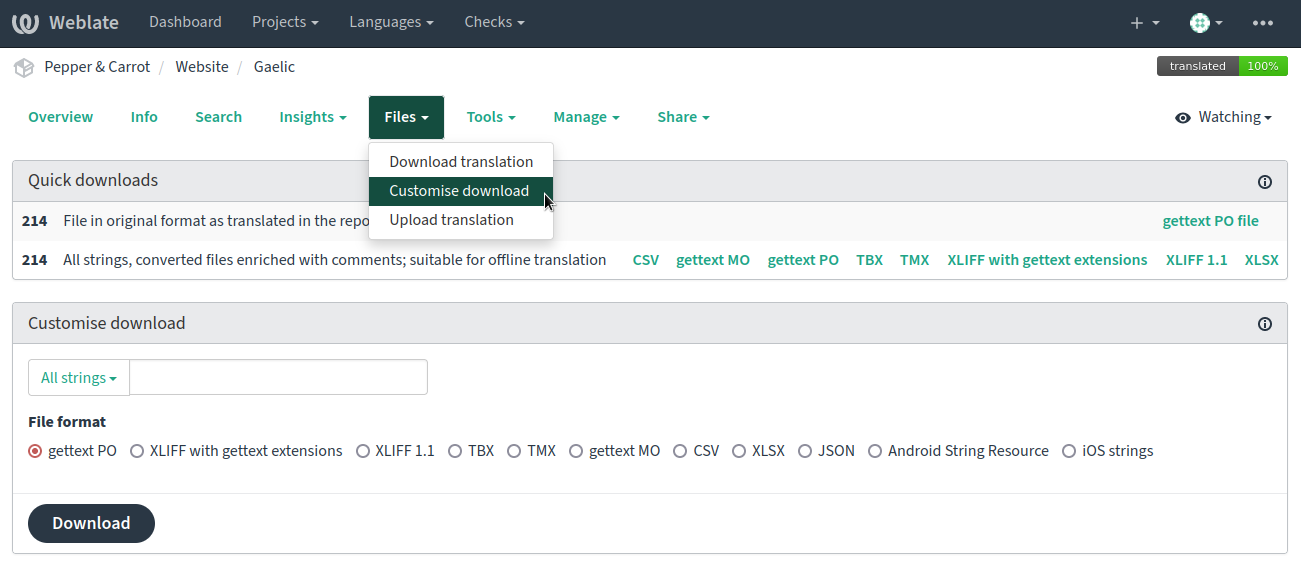
If your translation is incomplete, this page will also offer to download only the untranslated strings to make it easier to navigate the remaining work. Note that it's better to use the complete file if you can though, because it will give you a bit more context for each translation via the surrounding strings.
That's all for translating using Weblate!
2. Po files on Git
Now we saw the way to use Weblate, here is the more manual and advanced way to handle the translation using Gettext and PO files hosted on Git. The files are located in the po/ directory of the website
repository on Framagit.
In this directory, the translation consists of 3 parts:
- A
<locale>.pofile with the actual translation source code. This will be compiled by a script into thelocaledirectory. - A
<locale>-credits.jsonfile listing the translators for your language - A
<locale>.svgfile (optional) with the header image font artwork
Note: <locale> is the two letter small-case identifier of the lang used in
langs.json.
a. <locale>.po
To start a new translation, open the _catalog.pot file in a Po editor (see recommended tools below) and save it under po/<locale>.po (replacing <locale> with your language's code from langs.json). Using an editor like this will update the file header correctly for your language.
The Po file format is human-readable, so you can edit it in a plain text editor if you want. But Free/libre and open-source specialised tools are available to ease the task:
- PoEdit - This tool comes with some automated translation checks that are useful.
- Virtaal - This tool comes with a translation memory function and will be helpful in restoring older translations like the one stored for reference in po/archive. Virtaal also has a lot of convenient keyboard shortcuts.
Once you opened your file with the tool, you just need to click on the line to translate and fill it. Just repeat the process until you are done and save. Simple!
Special cases:
Sometime you'll come across strings that looks like this:
"Join the <a href=\"%s\">Pepper&Carrot chat room</a> to share your projects!"It's an HTML link, and you'll need to replicate the syntax if you want your translation to get the link.
You'll also come across the %s symbol:
"This picture is fan-art made by %s."The website will replace this special character %s with a string (in this case, the name of the author), so, please preserve this symbol.
For numbers, we use %d instead of %s. These are fetched using plural rules. Check the Translatehouse Localization Guide if you don't know the plural rules for your language. If you need further help with understanding the plural rules for your language, open an issue and tag @gunchleoc.
When the same string contains more than one of these placeholders, we number them so that you can change the word order, e.g. from:
"this %1$s can be reversed %2$d times"to
"%2$d times, this %1$s can be reversed"b. <locale>-credits.json
This files define the credits for the translation of the website. In its minimal form, you can write only the credits of the translation.
{
   "website-translation-credits": {
      "translation": [
         "Carrot"
      ]
}
The name field supports nicknames (single word) or composed names (many words) and you can add an URL of your choice to it between brackets. Proofreaders and Contributors can also be added. In its full form, the file might look like that:
{
   "website-translation-credits": {
      "translation": [
         "Lion Blue"
      ],
      "proofreading": [
         "Koala Yellow <http://www.forest.com>",
         "Giraffe Green"
      ],
      "contribution": [
         "Cat Carrot <https://www.peppercarrot.com>",
         "Dog",
         "Kitten Violet <https://minikitten.com>"
      ]
   }
}
These data are publicly visible on the website, on the License tab.
c. <locale>.svg
This Inkscape (svg) vector file customizes the title used on the front cover of the website, as well as the top title in the navigation bar. This file is optional, not providing it will force the website to use the en.svg version as a fallback. Specifications:
- 560×120px SVG (you can duplicate en.svg to get same geometry)
- Black colors to fill the shape.
- Saved as "Optimized SVG" in Inkscape to crunch the weight of the SVG.
You'll find font artwork already done on many of the header files of the webcomic and Navi's letter design. If you have trouble creating a good-looking title, ask other translators for help (e.g. by opening an issue on the webcomic repository).
d. <locale>.mo
Before the website can use the files, they need to be transformed into binary files. Unless you are running your own website installation for testing, you can ignore this part. If you want to know more, see the po/README.md on the website project.
 View history
 Edit
Edit